

Nothing’s more disappointing than dry, crumbly gluten-free baked goods. If you’ve wondered, “Why is my gluten-free baking always dry?” you’re not alone. The secret lies in understanding common pitfalls and using science-backed strategies. This guide reveals expert tips to transform your treats into soft, flavorful, and irresistibly moist gluten-free delights every time.
Understanding the Science Behind Gluten-Free Flour Absorption
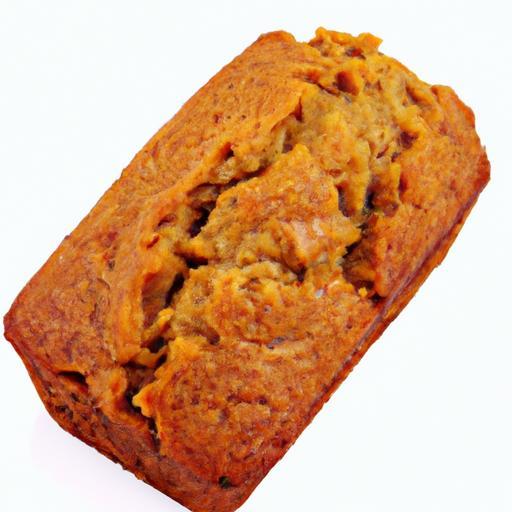
Why Is My Gluten-Free Baking Always Dry? This question has haunted many passionate bakers who strive for moist,tender treats but consistently end up with crumbly,parched results. The root of this challenge lies in understanding the unique behavior of gluten-free flours – they absorb liquids differently and lack the elastic protein network gluten provides. Unlike wheat, gluten-free flours, whether they’re almond, rice, or tapioca based, often soak up moisture unevenly.This means that mastering moisture balance is crucial to achieving those soft, luscious bakes that delight both eyes and palate.
When gluten-free flour meets water, it doesn’t form the same stretch or trap air bubbles the way conventional flour does. Instead, the starches and fibers absorb moisture and swell, sometimes over-absorbing or under-retaining liquids. this results in baked goods that can easily turn dry if the recipe is not carefully calibrated.The key to cracking this code lies in a delicate harmony: selecting flours with complementary absorption rates and pairing them with the right wet ingredients to preserve moisture throughout baking.
Mastering Moisture: Choosing the Right Ingredients for Soft Gluten-Free Bakes
To combat dryness, explore the magic of moisture-rich ingredients that work synergistically with gluten-free flour blends. Ingredients like Greek yogurt, mashed bananas, applesauce, or pureed pumpkin add not only natural sweetness but also retain moisture inside your batter or dough. These moist components bring tenderness and a velvety crumb structure by binding water molecules and releasing them slowly during baking.
Liquid fats,such as extra-virgin olive oil or melted coconut oil,also play a pivotal role. They coat flour particles, preventing excessive dryness and helping to lock moisture in. Consider balancing your wet ingredients to include both water-based and fat-based moisture – this equilibrium greatly influences the final texture.
The Role of Binders and Emulsifiers in Perfecting Texture
As gluten usually acts as the natural binder in wheat-based baking, gluten-free recipes rely on alternatives to create that ideal structure. Binders like xanthan gum, guar gum, or psyllium husk powder mimic gluten’s elasticity, holding the batter together and providing chewiness instead of crumbly fractures. Meanwhile, emulsifiers like egg yolks, lecithin, or ground flax seeds mixed with water help blend fat and water uniformly, improving mouthfeel and preventing dryness.
Whipping egg whites to soft peaks and folding them gently into your batter can introduce airiness and lightness too, compensating for the heavier nature of some gluten-free flours. Remember, moisture retention and proper aeration go hand in hand to create that coveted soft texture.
Expert Tips to Prevent Dryness and Achieve Luscious Gluten-Free Results
- Measure ingredients precisely: Gluten-free flour blends vary widely; always weigh flours if possible to avoid over- or under-absorption.
- Avoid overbaking: Bake just until a toothpick comes out clean – overcooking evaporates moisture quickly.
- Let baked goods rest: allow your cakes or breads to cool completely wrapped in a kitchen towel to redistribute moisture evenly.
- Experiment with flour blends: Combining high-absorption flours like sorghum or brown rice with lighter ones such as tapioca starch balances moisture retention.
- Incorporate natural syrups: A light brush of honey or maple syrup on warm cakes can add an extra layer of moistness and shine.
For more in-depth tips on gluten-free bakers’ favorite flour blends, see our Complete Guide to Gluten-Free Flour Blends. Additionally, consulting resources like the Celiac Disease Foundation can deepen your understanding of gluten-free baking science.
Prep and Cook Time
- Preparation: 15 minutes
- Cooking/Baking: 25-30 minutes (varies by recipe)
Yield
Serves 8-10, depending on portion size.
Difficulty Level
Medium – ideal for bakers agreeable with ingredient substitutions and careful measurements.
ingredients
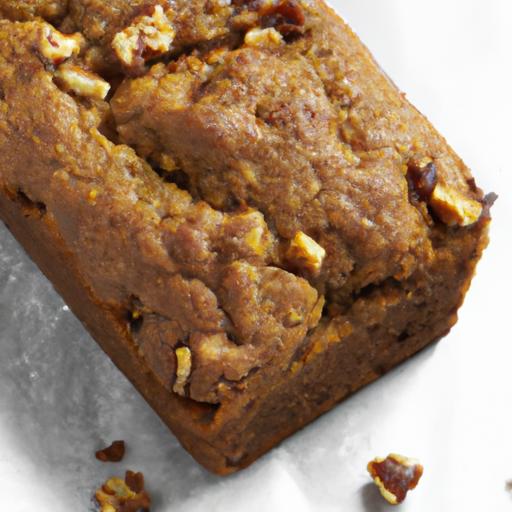
- 1 ½ cups gluten-free all-purpose flour blend (ensure xanthan gum included or add 1 tsp separately)
- ½ cup almond flour for softness and moisture retention
- ¼ cup tapioca starch for lightness and chew
- 1 tsp baking powder
- ½ tsp baking soda
- ½ tsp salt
- ¾ cup Greek yogurt (full fat for moisture)
- ½ cup mashed ripe banana (for natural sweetness and moisture)
- ½ cup maple syrup
- ⅓ cup extra-virgin olive oil or melted coconut oil
- 2 large eggs
- 1 tsp pure vanilla extract
Instructions
- Preheat your oven to 350°F (175°C). Lightly grease your baking pan or line it with parchment paper.
- Whisk dry ingredients: In a large bowl, combine the gluten-free flour blend, almond flour, tapioca starch, baking powder, baking soda, and salt. Whisk thoroughly to ensure even distribution.
- Mix wet ingredients: In a separate bowl, beat the eggs, then add Greek yogurt, mashed banana, maple syrup, olive oil, and vanilla extract. Mix until creamy and smooth.
- Combine: Gradually add the dry ingredients to the wet mixture, folding carefully with a spatula until just combined. Avoid overmixing to preserve air bubbles that keep the bake light.
- Pour batter into your prepared pan, spreading it evenly.
- Bake for 25-30 minutes or until a toothpick inserted into the center emerges clean or with a few moist crumbs.
- Cool completely on a wire rack. For best moistness,wrap the baked cake lightly with a kitchen towel during the cooling phase to trap and redistribute moisture.
Chef’s Notes
- Substitutions: feel free to swap almond flour with hazelnut flour for a nuttier flavor.If avoiding eggs, replace each with 3 tablespoons ground flaxseed mixed with 9 tablespoons water (let sit 5 mins).
- Make Ahead: This batter can rest in the fridge up to 24 hours before baking – moisture develops further, enhancing texture.
- Storage: store baked goods airtight at room temperature for up to 3 days or freeze wrapped tightly for up to 2 months.
- Troubleshooting: If your bake is still dry, add an extra 2 tablespoons of yogurt or applesauce next time and make sure not to overbake.
Serving Suggestions
serve slices topped with a dollop of whipped coconut cream and fresh berries for a vibrant burst of color and freshness. Dust with a light sprinkle of cinnamon or powdered sugar to enhance visual appeal. For a cozy twist, drizzle warm honey over warm cake right out of the oven – the glaze will soak in, creating irresistible moistness with every bite.
Pair your finish with a cup of spiced chai or herbal tea to complement the nutty, sweet notes of your gluten-free creation.

| nutrient | Per Serving |
|---|---|
| Calories | 220 |
| Protein | 5g |
| Carbohydrates | 30g |
| Fat | 9g |
Q&A
Q&A: Why Is my gluten-Free baking Always Dry? Secrets Revealed!
Q1: Why does gluten-free baking often turn out dry compared to regular baking?
A1: Gluten-free flours lack the natural elasticity and moisture retention that gluten provides in traditional baking. Gluten acts like a sponge, trapping moisture and giving structure, which means without it, baked goods can easily become dry or crumbly if not balanced with the right ingredients.
Q2: Can the type of gluten-free flour affect the dryness of my baked goods?
A2: Absolutely! Different gluten-free flours absorb liquids differently. For example, rice flour tends to be drier, while almond or oat flour holds more moisture.A blend of various flours and starches (like tapioca or potato starch) frequently enough works best to create a moist, tender crumb rather than relying on a single type.
Q3: How critically important is hydration in gluten-free baking?
A3: Hydration is crucial! Gluten-free flours generally need more moisture than wheat flour to prevent dryness. Increasing the liquid content-like water, milk, or dairy-free milk-can definitely help your batter or dough stay hydrated and produce softer baked goods.
Q4: Are there any natural ingredients that can add moisture to gluten-free baked treats?
A4: Yes! Ingredients like applesauce, mashed banana, pumpkin puree, or even yogurt (dairy or non-dairy) can add both moisture and flavor. These not only help keep things tender but also add a bit of natural sweetness and richness that combats dryness.
Q5: Does baking time play a role in dryness?
A5: Definitely. Gluten-free baked goods can go from perfectly moist to dry quickly if overbaked. Because they’re often more delicate,its important to check doneness a few minutes earlier than the recipe suggests,and consider using a toothpick test carefully to avoid overcooking.
Q6: What about binders-do they affect moisture?
A6: Bindings agents like xanthan gum, guar gum, or psyllium husk powder do more than hold your baked goods together-they can also trap moisture. Using the right amount helps maintain a soft and cohesive texture without dryness or crumbliness.
Q7: How can I improve the texture without adding extra fat?
A7: Introducing moisture-rich ingredients like applesauce or yogurt can help without increasing fat. Additionally, mixing in a small amount of starch (like cornstarch or arrowroot) keeps crumb light and moist, balancing structure and softness.
Q8: Is it helpful to rest gluten-free batter or dough before baking?
A8: Yes! Letting your batter or dough rest for 20-30 minutes before baking allows the flours to fully hydrate and starches to swell, leading to better moisture retention and a less dry texture after baking.
Q9: Can the oven temperature impact dryness?
A9: Oven temperature matters a lot. Baking at too high a temperature can cause moisture to evaporate quickly, resulting in dry baked goods.Using a moderate temperature and possibly placing a pan of water near your oven’s heat source can create steam, which helps maintain moisture.
Q10: Are there tips for storing gluten-free baked goods to keep them moist longer?
A10: Store your gluten-free items in an airtight container at room temperature or in the fridge, depending on the item.Adding a slice of bread or a damp paper towel inside the container can definitely help maintain moisture. For longer storage,freezing is ideal-just thaw gently to avoid drying out.
Unlocking the secrets to moist and tender gluten-free baking is all about harmony-balancing hydration, using the right flour blends, adding natural moist ingredients, and baking with care. With these tips, dryness will be a thing of the past!
To Wrap It Up
Baking gluten-free can feel like navigating a tricky maze-one wrong turn, and you end up with dry, crumbly results instead of the soft, moist treats you crave. But now that you know the secrets behind dryness-from the right flour blends and moisture boosters to precise baking times-you’re equipped to transform your gluten-free goodies into utterly delightful bites. Remember, it’s all about balance, experimentation, and a little patience. so go ahead, mix, bake, and enjoy the delicious journey, because perfectly moist gluten-free baking isn’t a myth-it’s your next achievement. Happy baking!