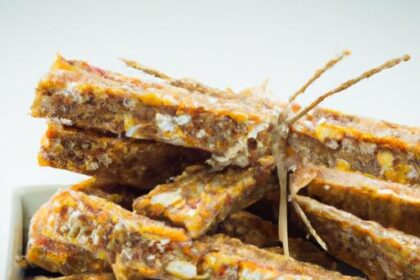

There’s something undeniably satisfying about the crunch of Toasted Breadcrumbs—a golden, crispy layer that transforms ordinary dishes into textural masterpieces. But what if you’re steering clear of gluten? Achieving that perfect crunch with Toasted Breadcrumbs made from gluten-free ingredients might seem like a culinary puzzle. Fear not: mastering Toasted Breadcrumbs, even in gluten-free form, is not only possible but an adventure in flavor and technique. In this guide, we’ll explore tips and tricks to help you create crispy, flavorful Toasted Breadcrumbs that elevate your meals, proving that gluten-free can be just as crunchy, savory, and downright tasty. Get ready to toast your way to a new kitchen favorite with Toasted Breadcrumbs.
Choosing the Perfect Gluten-Free bread for Ultimate Crunch
Crunchy & gluten-free breadcrumbs start with selecting the right base bread. Not all gluten-free breads toast up with the same crispness or texture, so choosing one built for crunch is essential. Look for breads made primarily with rice flour, tapioca starch, or sorghum flour, as these tend to dry out evenly and become beautifully crunchy without turning gummy or brittle. Avoid overly moist or dense gluten-free loaves-light, airy slices with a slightly coarse crumb give you the best chance for golden, shatteringly crisp results. When possible, opt for artisanal or homemade gluten-free bread with minimal preservatives and no added fats; these develop a sturdy crumb that toasts evenly [source].
Techniques to Achieve Evenly Toasted Breadcrumbs Every Time
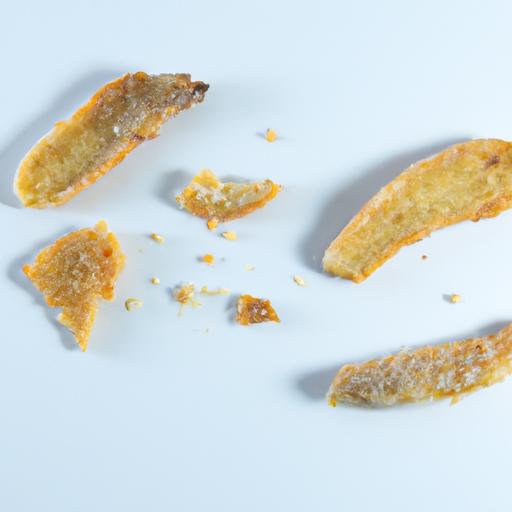
mastering toasted breadcrumbs demands both patience and technique to ensure that every bite is crunchy without a hint of burning. Start by drying your gluten-free bread completely-either by leaving slices exposed overnight or toasting gently in a low oven (around 200°F/95°C) until crisp but not browned. Onc dried, pulse the bread in short bursts in a food processor to achieve uniform crumb size; this promotes even browning.
To toast, spread the crumbs in a single layer on a baking sheet lined with parchment. Use a moderate oven temperature of 300°F (150°C) and toss the crumbs every 7-8 minutes to avoid scorching, allowing them to achieve that perfect golden-brown color and crunch. Alternatively, crisping them gently in a dry skillet over medium heat, stirring constantly, works excellently for small batches-just be vigilant to prevent hot spots. either method keeps the toasted breadcrumbs evenly crunchy and flavorful, transforming gluten-free basics into unusual culinary assets.
Creative Uses for crunchy Gluten-Free Breadcrumbs in your Recipes
Imported with the glorious crunch from carefully toasted gluten-free breadcrumbs, your dishes will leap to new heights of texture and flavor. Use these breadcrumbs as a crunchy topping for roasted vegetables, casseroles, or baked pasta dishes, adding an irresistible golden layer that contrasts beautifully with soft fillings. They’re exquisite as a crispy crust for pan-fried proteins like chicken breast or fish fillets, providing a satisfying snap that gluten-free eaters crave.
Sprinkle toasted gluten-free breadcrumbs over fresh salads for a nutty crunch or blend them into meatless veggie balls and patties to improve their structure and mouthfeel. For an unexpected twist, incorporate them into savory gluten-free stuffing or coat fried green tomatoes for a crisp exterior. For inspiration, check out our guide on gluten-free cooking basics to pair your crunchy breadcrumbs creatively.
Storing and Preserving Toasted Breadcrumbs to Maintain freshness
Once you’ve perfected your crunchy gluten-free breadcrumbs, keeping them fresh and crispy is key to ensuring every use is as satisfying as the first. Store the cooled breadcrumbs in an airtight glass jar or a tightly sealed food-grade container. avoid plastic bags for long-term storage, as they can trap moisture and cause sogginess. Place the container in a cool, dry pantry away from sunlight.
For maximum freshness, keep smaller batches for everyday use and freeze any extras in vacuum-sealed bags. When thawing, spread them on a baking sheet and give them a quick 5-minute re-toast at 300°F (150°C) to revive that unmistakable crunch. proper storage preserves the distinctive texture and flavor, so your gluten-free breadcrumbs stay ready to elevate any meal.
Prep and Cook Time
- Prep: 10 minutes (plus bread drying time)
- Cook: 20 minutes
- Total: 30 minutes (excluding drying)
Yield
- Approximately 1 ½ cups of toasted gluten-free breadcrumbs
Difficulty Level
- Easy – perfect for gluten-free cooks of all skill levels
Ingredients
- 4-5 slices gluten-free bread (preferably rice or sorghum based, dried overnight or toasted)
- 2 tablespoons olive oil (optional, for extra golden crispiness)
- 1/2 teaspoon garlic powder (optional, for flavor enhancement)
- 1/2 teaspoon dried Italian herbs (optional)
- Salt, to taste
Instructions
- Dry the bread: lay slices on a wire rack overnight or bake at 200°F (95°C) for 15-20 minutes, until completely crisp but not browned.
- Break into chunks: cut dried bread into smaller pieces suitable for your food processor.
- Pulse crumbs: Pulse bread chunks 6-8 times in short bursts to create even-sized crumbs. Avoid over-processing to prevent powdery dust.
- Toss with oil and seasonings (optional): Transfer crumbs to a bowl and mix in olive oil,garlic powder,Italian herbs,and a pinch of salt for extra flavor.
- Toast crumbs: spread breadcrumbs evenly on a parchment-lined baking sheet. Bake at 300°F (150°C) for 15-20 minutes, stirring every 7-8 minutes, until they turn golden and crunchy.
- Cool completely: Remove from the oven and let crumbs cool fully on the pan to maintain crispness.
- Store or use instantly: Transfer to an airtight container and use as desired.
Chef’s Notes & Tips for Success
- Customize crumb size: For coarser crumbs, pulse fewer times; for finer breadcrumbs perfect for breading, pulse a bit longer.
- Skip oil for a lighter option: Toast crumbs dry for a lower-fat version-you’ll still get outstanding crunch.
- Garlic and herbs get stronger: Adjust seasoning before toasting since the flavor intensifies with heat.
- Make ahead and freeze: Toasted breadcrumbs freeze beautifully in sealed bags for up to 3 months.
- Keep crumbs dry: If you notice sogginess, re-toast in the oven for a few minutes before use.
Serving Suggestions
- Sprinkle over gluten-free mac & cheese before baking for a perfectly crunchy topping.
- Use as a crispy crust for pan-seared chicken breasts or baked cod instead of traditional flour or panko.
- Add a textural surprise to roasted root vegetables by tossing breadcrumbs with olive oil and herbs, then sprinkling after roasting.
- Mix into savory gluten-free meatball and veggie burger mixtures for binding and crunch.
- Top fresh green salads with toasted crumbs and parmesan ribbons for sophisticated texture contrasts.
| Nutritional Info | Per 1/4 cup serving |
|---|---|
| Calories | 110 |
| Protein | 2g |
| Carbohydrates | 20g |
| Fat | 3g (if olive oil added) |

Q&A
Q&A: Crunchy & Gluten-Free – Mastering Toasted Breadcrumbs Tips
Q1: Why choose gluten-free breadcrumbs over traditional ones?
A1: Gluten-free breadcrumbs open the door to delicious textures and crispiness without the gluten,making them perfect for those with sensitivities or celiac disease. Plus, they add a fresh twist to your dishes while keeping them safe and satisfying.Q2: What are the best gluten-free breads to turn into breadcrumbs?
A2: Look for sturdy gluten-free breads made from ingredients like rice flour, almond flour, or chickpea flour. These tend to toast beautifully and hold their crunch well. Avoid super moist or airy gluten-free breads, as they might not provide that perfect crispy texture.
Q3: How do you make gluten-free breadcrumbs crunchy and flavorful?
A3: Start by drying out the bread – either leave it out overnight or bake it low and slow in the oven. Then pulse it in a food processor until coarse or fine, depending on your desired texture. toast the crumbs gently in olive oil or a plant-based butter option with herbs and spices to infuse flavor and create that irresistible crunch.
Q4: Can I customize the seasoning for toasted gluten-free breadcrumbs?
A4: absolutely! Gluten-free breadcrumbs are a fantastic blank canvas. Try adding smoked paprika, garlic powder, nutritional yeast, or fresh herbs like rosemary and thyme for a burst of taste. Sea salt and cracked black pepper are classics that enhance natural flavors beautifully.
Q5: What dishes benefit most from crunchy gluten-free toasted breadcrumbs?
A5: the possibilities are endless. Use them as a topping on roasted vegetables, a crispy coating for fried or baked tofu and chicken alternatives, a crunchy layer for casseroles, or even mixed into stuffing that’s safe for gluten-free diets.Q6: How do you store gluten-free breadcrumbs to maintain crunch?
A6: Keep your toasted gluten-free breadcrumbs in an airtight container at room temperature. For longer storage,place them in a sealed bag or jar in the freezer. Just toast them again briefly before use if they lose any crunch.
Q7: Is it possible to make gluten-free panko-style breadcrumbs?
A7: Yes! Panko-style gluten-free breadcrumbs usually come from crustless, airy gluten-free bread sliced thinly and dried out. Pulse carefully to get those light, flaky crumbs that yield an ultra-crispy result when toasted or fried.Q8: Any tips for toasting gluten-free breadcrumbs without burning?
A8: Absolutely! Keep the heat medium-low and stir frequently. Toast just until they turn golden and release a nutty aroma. burnt crumbs become bitter and lose that enjoyable crunch. Patience is key to perfect toasting.
Q9: Can toasted gluten-free breadcrumbs be used as a binder in recipes?
A9: Yes, they work wonderfully as a binder while adding texture, especially in gluten-free meatballs, veggie patties, or even crumbly toppings. Just ensure they’re finely ground so they mix evenly.
Q10: What cooking fats work best for toasting gluten-free breadcrumbs?
A10: Olive oil, avocado oil, or quality refined coconut oil are excellent choices for toasting breadcrumbs. They impart delightful flavor while maintaining a crisp, golden finish.
Armed with these tips,your gluten-free toasted breadcrumbs will master both crunch and flavor,making every dish pop with irresistible texture!
Final Thoughts
Whether you’re elevating a weeknight dinner or adding that irresistible crunch to your favorite gluten-free dishes,mastering toasted breadcrumbs is an art worth perfecting. With these tips in hand,you can transform simple crumbs into golden,crispy gems that deliver texture and flavor without compromise. So next time you reach for that gluten-free breadcrumb blend,remember: a little toasting magic goes a long way in turning meals from ordinary to extraordinary. Crunch on, and savor every bite!