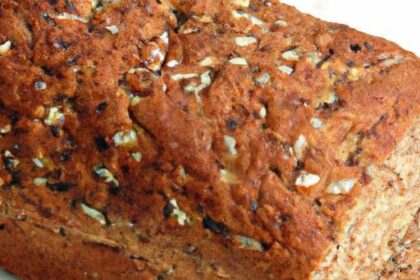


There’s nothing quite like the warm aroma of freshly baked Gluten-Free Bakes filling your kitchen—whether it’s a fluffy almond cake, a crisp biscotti, or tender banana bread. But as anyone who has ventured into the world of Gluten-Free Bakes knows, keeping those delightful treats fresh and delicious beyond the first bite can be a challenge. Without gluten’s natural binding and moisture-retaining properties, Gluten-Free Bakes can sometimes dry out or lose their charm faster than traditional recipes. Fear not! In this article, we’re unveiling savvy tips and clever tricks to help your Gluten-Free Bakes stay perfectly fresh, moist, and scrumptious for longer. Say goodbye to stale slices and hello to lasting loveliness with Gluten-Free Bakes that truly shine!
Stay Fresh: Tips to Keep Gluten-Free Bakes perfect Longer
Stay fresh with your gluten-free creations by mastering the art of choosing the right ingredients, smart storage, and clever rejuvenation tricks. Gluten-free baking brings its own set of exciting challenges, but with a little insight and practice, your treats will remain irresistibly moist, tender, and flavorful for days on end. Drawing from years of culinary styling and firsthand kitchen experience, I’ll guide you through techniques that celebrate the unique textures and flavors of gluten-free goods while ensuring they stay as delightful as the moment they came out of the oven.
Prep and Cook Time
- Prep Time: 20 minutes
- Cook Time: 30 minutes
- Total Time: 50 minutes
Yield
- 8 servings
Difficulty Level
- Medium
Ingredients
- 1 ¾ cups gluten-free all-purpose flour blend, sifted
- ½ cup almond flour, finely ground
- 1 tsp xanthan gum*
- 1 tsp baking powder, gluten-free certified
- ½ tsp baking soda
- ¼ tsp fine sea salt
- ¾ cup organic cane sugar
- 2 large free-range eggs, room temperature
- 1 tsp pure vanilla extract
- ½ cup unsweetened applesauce (for moisture)
- ⅓ cup melted coconut oil or unsalted butter
- ½ cup buttermilk (or dairy-free alternative)
Instructions
- Preheat the oven to 350°F (175°C).Line an 8×8-inch baking pan with parchment paper and lightly grease the sides to prevent sticking.
- whisk together the gluten-free flour blend, almond flour, xanthan gum, baking powder, baking soda, and sea salt in a large bowl until evenly combined.
- In a separate bowl, beat the eggs and sugar until fluffy and light yellow-this aerates for a tender crumb.
- Gradually add the applesauce, vanilla extract, and melted coconut oil (or butter) to the wet mixture, mixing gently to combine without deflating.
- Alternate adding the dry flour mixture and buttermilk to the wet ingredients, starting and ending with the dry. Mix just until smooth; overmixing can toughen gluten-free batters.
- Pour the batter evenly into the prepared pan, smoothing the top with a spatula. Tap gently on the counter to release air bubbles.
- Bake for 28 to 32 minutes or until the edges turn golden and a toothpick inserted in the center comes out clean or with just a few moist crumbs.
- Cool the bake in the pan for 10 minutes, then transfer to a wire rack to cool completely before slicing to preserve moisture and texture.
Tips for Success
- Xanthan gum is essential for structure-if your flour blend contains it already, omit the extra teaspoon to avoid gumminess.
- Using a combination of gluten-free flours like almond flour adds natural fats and nuttiness, enhancing freshness and crumb.
- Buttermilk creates tenderness and reacts with baking soda to give a light rise-substitute with coconut yogurt and a dash of lemon juice for dairy-free.
- For longer freshness, incorporate natural humectants like applesauce or mashed banana; these ingredients help retain moisture.
- Always let your bakes cool completely before storing to prevent condensation, which speeds spoilage.
Serving Suggestions
Present your fresh gluten-free bakes with a dollop of whipped coconut cream or a drizzle of homemade berry compote for a burst of color and flavor. Sprinkle with toasted chopped nuts or a light dusting of powdered sugar for contrast. Pair with fragrant herbal teas or rich, cold-brew coffee to elevate the sensory experience and celebrate every tender crumb.

Smart Storage Solutions for Prolonging Gluten-Free Bake Life
Storing gluten-free baked goods properly is a game-changer for keeping them fresh longer. use airtight containers with a layer of parchment paper between stacked slices to prevent sticking and moisture accumulation. For multi-day storage, a cool, dark pantry works well, but refrigeration extends life without drying if wrapped tightly in plastic wrap or beeswax wraps. When freezing, slice first and arrange pieces in a single layer on a baking sheet; onc frozen, transfer to freezer-safe bags to maintain texture and ease of thawing.
Creative Techniques to Revive and Refresh Your Gluten-Free Treats
Even the freshest gluten-free bakes can benefit from a little revival magic. To bring back softness, try lightly warming your treat in a microwave for 10-15 seconds wrapped in a damp paper towel-this adds needed moisture. Toasting thick slices in a pan or oven can add a crisp outside while softening the inside. For more indulgent refreshment,serve with a spread of almond butter,a spoonful of ricotta,or a drizzle of honey that contrasts beautifully with the bake’s nutty profile.
| nutrient | Per Serving |
|---|---|
| Calories | 210 |
| Protein | 5g |
| Carbohydrates | 28g |
| Fat | 9g |
For further reading on the science behind gluten-free baking ingredients, visit the Gluten-free Living website. Or check our baking basics guide for more expert tips and recipes.
Q&A
Q&A: Stay Fresh – Tips to keep Gluten-Free Bakes Perfect Longer
Q1: Why do gluten-free bakes go stale faster than regular baked goods?
A1: Gluten acts like a natural binder and moisture trap in traditional baking,giving breads and cakes a fluffy,soft texture that holds up well over time. Without gluten, gluten-free bakes frequently enough have a drier crumb and can lose moisture quickly, leading to a faster staling process. That’s why extra care is needed to keep them fresh and delicious.
Q2: How can I prevent my gluten-free breads from drying out?
A2: One trick is to incorporate moisture-rich ingredients like applesauce, yogurt, or mashed bananas into your recipes. During storage,wrap your bread tightly in plastic wrap and then place it inside an airtight container or a resealable bag to lock in moisture. For longer storage, freezing slices individually is a great way to preserve freshness.
Q3: Are there specific flours that help gluten-free bakes stay softer?
A3: Yes! Using a blend of flours can work wonders. For example, rice flour combined with tapioca starch and a bit of xanthan gum mimics gluten’s stretch and chewiness. Nut flours like almond or coconut add moisture and softness, too. Experimenting with these blends helps create a tender crumb that resists drying out.
Q4: What role does refrigeration play in storing gluten-free baked goods?
A4: Refrigeration slows mold but speeds staling. Best: keep airtight at room temp for 1–2 days, or freeze for longer. If refrigerated, wrap well and rewarm before eating.
Q5: Can I refresh gluten-free baked goods that have gone stale?
A5: Yes! Mist with water and warm in the oven/toaster, or steam briefly to restore softness.
Q6: What’s the secret to keeping gluten-free muffins and cupcakes moist?
A6: Use ingredients like sour cream, buttermilk, or oil. Store airtight with paper towels, eat within 1–2 days, or freeze extras.
Q7: How does altitude affect the freshness of gluten-free baked goods?
A7: High altitude dries bakes faster. Add a bit more liquid and shorten baking time/temp to keep them moist.
Q8: Any storage hacks beyond freezing and wrapping?
A8: Separate slices with parchment, add apple or grapes briefly for humidity, and only cut what you need to keep the rest fresh.
With these creative tips up your sleeve, keeping your gluten-free bakes fresh, soft, and utterly delicious has never been easier.happy baking and happy savoring!
In Conclusion
As you embark on your gluten-free baking adventures, remember that keeping your creations fresh is just as much a part of the craft as mixing the perfect batter. with a sprinkle of mindful storage, a dash of quality ingredients, and a pinch of patience, your gluten-free bakes can stay soft, flavorful, and delightful day after day. So go ahead-bake with confidence, savor every bite, and let these tips be your secret ingredient to longer-lasting deliciousness.Because when freshness lasts, every crumb tells a story worth savoring.